
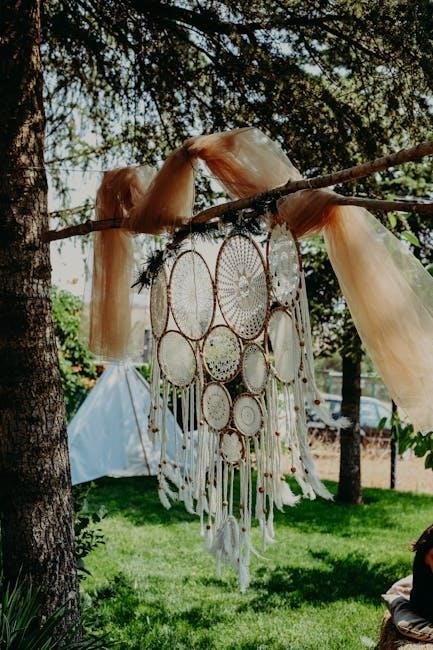
Macrame Christmas tree patterns offer a creative way to craft beautiful‚ intricate designs using knots and cords‚ perfect for festive decorations. This traditional technique allows for unique‚ customizable trees that add charm to any holiday setting.
1.1 What is Macrame?
Macrame is a traditional craft that involves creating intricate designs using knotting techniques. Originating centuries ago‚ it has evolved into a popular method for making decorative items like wall hangings‚ jewelry‚ and home decor. Macrame relies on basic knots‚ such as the Lark’s Head‚ Sheet Bend‚ and Half Hitch‚ to form patterns. The craft is admired for its versatility‚ allowing artists to create both delicate and robust designs. Macrame Christmas tree patterns bring this timeless art to holiday decorations‚ offering a unique and customizable way to celebrate the season. With its emphasis on handcrafted details‚ macrame adds a personal touch to festive displays‚ making it a cherished activity for crafters of all skill levels.
1.2 Benefits of Making a Macrame Christmas Tree
Making a macrame Christmas tree offers numerous benefits‚ combining creativity with practicality. It allows for personalization‚ enabling crafters to choose colors‚ sizes‚ and ornaments that match their holiday theme. This handmade approach fosters a sense of accomplishment and adds a unique‚ sentimental value to decorations. Additionally‚ macrame trees are eco-friendly‚ as they can be reused for multiple seasons‚ reducing waste. The process itself is meditative‚ providing a relaxing hobby during the festive season. Moreover‚ macrame trees are space-saving‚ ideal for small apartments or offices. They also make thoughtful gifts‚ showcasing craftsmanship and care. Overall‚ creating a macrame Christmas tree is a rewarding and meaningful way to celebrate the holiday spirit while expressing creativity.
Materials Needed for a Macrame Christmas Tree
For a macrame Christmas tree‚ you’ll need a macrame cord‚ scissors‚ dowel or ring‚ measuring tape‚ and a board for knotting. Optional ornaments and beads add personality.
2.1 List of Required Materials
To create a macrame Christmas tree‚ you’ll need the following materials:
- Macrame cord: Available in various textures and colors‚ this is the primary material for knotting.
- Dowel or ring: Serves as the base for forming the tree structure.
- Scissors: For cutting the cord to the desired length.
- Measuring tape: To ensure accurate measurements during the knotting process.
- Sturdy board or surface: For securing the dowel while knotting.
- Ornament hooks or beads: Optional for adding decorations.
- Fabric glue or stiffener: To stabilize the tree shape if needed.
- Trimming tool: To tidy up loose ends of the cord.
These materials ensure a smooth and creative macrame experience‚ allowing you to craft a unique Christmas tree design.
2.2 Description of Each Material
Macrame cord is the foundational material‚ available in cotton‚ nylon‚ or wool‚ chosen for durability and texture. A dowel or ring acts as the tree’s base‚ providing structure. Scissors are essential for cutting cord lengths accurately. A measuring tape ensures precise measurements for even knotting. A sturdy board or surface holds the dowel securely during work. Ornament hooks or beads add decorative elements. Fabric glue or stiffener helps maintain the tree’s shape. Trimming tools tidy stray cord ends. Each material plays a specific role in creating a polished‚ professional-looking macrame Christmas tree.

Basic Macrame Knots for Beginners

Basic macrame knots are foundational for creating intricate designs. They are essential for crafting a macrame Christmas tree. Mastering these knots is key for beginners to build their skills.
3.1 Lark’s Head Knot
The Lark’s Head Knot is a fundamental macrame knot used to attach cords to a base or another cord. It is simple to learn and forms the foundation for more complex patterns. To create a Lark’s Head Knot‚ fold the cord in half and pass the folded end over the base. Then‚ bring the ends under and through the loop created by the fold. Pull gently to tighten. This knot is essential for starting projects like a macrame Christmas tree‚ as it allows cords to be secured neatly. It’s also versatile‚ making it a key technique for beginners; Practicing this knot ensures a strong base for your design. It’s a starting point for many patterns and is used frequently in macrame crafts.
3.2 Sheet Bend Knot
The Sheet Bend Knot is a versatile and essential knot in macrame‚ used to join two cords together. It is particularly useful when working with multiple strands or when extending the length of a cord. To create a Sheet Bend Knot‚ lay one cord over the other‚ forming a loop with the working ends. Bring the ends of the top cord under the bottom cord and pass them through the loop from the opposite side. Pull gently to tighten the knot‚ ensuring it is secure. This knot is ideal for connecting cords in a macrame Christmas tree pattern‚ allowing for seamless transitions between strands. It is a reliable and simple technique that adds flexibility to your design. Mastering the Sheet Bend Knot is crucial for creating intricate and balanced macrame pieces‚ especially during the holiday season.
3.3 Half Hitch Knot
The Half Hitch Knot is a fundamental macrame knot that is both simple and versatile. It is often used to create decorative patterns and secure cords to a base or other elements. To tie a Half Hitch Knot‚ loop the cord around an object or another cord‚ then pass the working end through the loop from the underside. Pull gently to tighten‚ ensuring the knot holds firmly. This knot is particularly useful for creating balanced designs and adding texture to your macrame Christmas tree. It is also a great way to attach ornaments or beads to the tree structure. The Half Hitch Knot is essential for achieving intricate patterns and can be combined with other knots for more complex designs. With practice‚ it becomes a cornerstone of your macrame skills‚ enhancing the beauty of your handmade Christmas tree.
3.4 Wrap Knot
The Wrap Knot is a simple yet effective knot used to secure multiple cords together or to attach them to a central structure. It is particularly useful in macrame Christmas tree patterns for creating branches or stabilizing sections of the tree. To tie a Wrap Knot‚ loop the cord around the desired area‚ then pass the working end through the loop from the top. Pull gently to tighten‚ ensuring the cords are held securely. This knot is ideal for organizing and managing multiple strands‚ making it easier to create complex designs. The Wrap Knot is also versatile‚ allowing for adjustments as you build your tree. It is a key technique for achieving symmetry and balance in your macrame project. Regular practice will help you master this essential knot‚ which is fundamental to creating intricate and visually appealing patterns for your Christmas tree.
3.5 Square Knot
The Square Knot‚ also known as the Reef Knot‚ is a fundamental knot in macrame that is easy to learn and essential for various applications. It is commonly used to join two ends of a cord together or to connect multiple cords in a macrame Christmas tree pattern. To tie a Square Knot‚ cross one cord over the other‚ loop the ends around each other‚ and pull them tight to form a secure and balanced knot. This knot is particularly useful for creating seamless connections between branches or for attaching ornaments in your design; The Square Knot is both durable and neat‚ making it an ideal choice for intricate patterns. Regular practice will ensure that your knots are consistent and hold well‚ adding stability to your macrame project. It is a versatile and indispensable knot for achieving professional-looking results in your Christmas tree creations.
Step-by-Step Guide to Making a Macrame Christmas Tree
Follow this detailed guide to craft a stunning macrame Christmas tree‚ from preparing materials to adding final decorations‚ ensuring a beautiful and personalized holiday decoration.

4.1 Preparing the Macrame Cord
Preparing the macrame cord is the first step in creating your Christmas tree. Begin by cutting the cord to the desired length‚ ensuring it’s long enough to form the tree shape and branches. Fold the cord in half to create a loop at one end‚ securing it with a pin or clamp. This loop will serve as the base for your tree. Next‚ divide the cord into two equal parts‚ folding each strand to create additional loops for the branches. To prevent tangling‚ organize the strands by securing them to a stable object like a clipboard or board. Make sure the cords are evenly spread and ready for knotting. Proper preparation ensures a smooth and organized crafting process‚ setting the foundation for your macrame Christmas tree design.
4.2 Creating the Tree Shape
Start by creating the foundation of your macrame Christmas tree. Begin at the top‚ using the prepared cord to form the tree’s apex. Use a Lark’s Head Knot to secure the cord to a stable point‚ such as a wooden dowel or a metal ring‚ which will serve as the tree’s base. From there‚ work downward‚ forming branches by tying Half Hitch Knots to create a layered effect. To achieve a realistic tree shape‚ space the knots evenly‚ gradually increasing the number of knots as you move down to mimic the branches of a natural tree. Use Square Knots to secure the branches in place‚ ensuring the structure remains sturdy. As you progress‚ gently pull the cords to tighten the knots and shape the tree into a triangular form. Finally‚ secure the base of the tree by tying a Wrap Knot around the dowel or ring to hold everything in place. This step sets the framework for adding ornaments and decorations.
4.3 Adding Ornaments and Decorations
Once the tree shape is formed‚ it’s time to add ornaments and decorations. Start by threading small beads‚ sequins‚ or mini ornaments onto the macrame cords. Use a Lark’s Head Knot or a Square Knot to secure them in place. For larger ornaments‚ attach them using a Sheet Bend Knot or by weaving the cord through the ornament’s loop. Distribute the decorations evenly across the branches‚ focusing on the tips for a balanced look. Consider adding a star or angel at the top using a Wrap Knot for a festive touch. To enhance the tree’s sparkle‚ incorporate glittering thread or metallic beads. Experiment with color schemes to match your holiday theme. Finally‚ fluff out the cords to create a natural‚ layered appearance‚ ensuring the ornaments sit securely and attractively on the tree.
4.4 Finishing Touches
After constructing and decorating your macrame Christmas tree‚ it’s time for the finishing touches. Trim any excess cord ends using sharp scissors‚ ensuring a clean and polished look. Inspect the knots to make sure they are secure and tighten any that may have loosened during the process; Gently fluff out the cords to create a natural‚ layered appearance. If needed‚ adjust the tree’s shape by pulling on the cords to achieve the desired fullness and symmetry. Finally‚ attach a small loop or hook at the top for hanging‚ and consider adding a decorative base or stand for stability. Step back and admire your handiwork‚ making any final adjustments to ensure the tree looks balanced and festive. These final steps will bring your macrame Christmas tree to life‚ ready to be displayed proudly during the holiday season.
4.5 Optional: Adding Lights or Glitter
To elevate your macrame Christmas tree‚ consider adding lights or glitter for extra sparkle. For lights‚ use fairy lights or small string lights‚ carefully weaving them through the cords to create a warm‚ glowing effect. Secure the lights with small knots or tape if needed. For glitter‚ lightly spray fabric glitter spray onto the cords or apply fine glitter using a small brush for a more controlled look. Avoid overloading the tree with too much glitter to maintain its delicate appearance. These optional embellishments add a festive touch‚ making your macrame tree stand out. Experiment with different light colors or glitter shades to match your holiday decor; This step allows for personal creativity‚ ensuring your tree is uniquely yours and radiates holiday cheer. It’s a simple yet impactful way to enhance your finished macrame Christmas tree design.
Customizing Your Macrame Christmas Tree
Customizing your macrame Christmas tree allows for personal touches‚ making it uniquely yours. Choose different sizes‚ colors‚ or add embellishments like beads or ribbons for a personalized look that reflects your style.

5.1 Choosing Different Sizes
Choosing different sizes for your macrame Christmas tree allows you to tailor its presence in your space. A smaller tree can serve as a delicate tabletop decoration‚ while a larger one becomes a striking focal point. Consider the available space and desired impact when selecting the size. For instance‚ mini trees are ideal for mantels or shelves‚ whereas taller designs can stand independently. Adjusting the cord length and knot density helps achieve the perfect proportions. This versatility ensures your macrame tree fits seamlessly into any setting‚ from cozy apartments to grand halls. Personalizing the size makes the piece uniquely suited to your home’s aesthetic and holiday decor vision.
5;2 Selecting Color Schemes
Selecting the right color scheme for your macrame Christmas tree can elevate its visual appeal and align it with your holiday decor. Traditional options like green and red evoke a classic festive vibe‚ while neutral tones such as cream‚ beige‚ or white create a modern‚ minimalist look. For a rustic charm‚ earthy shades like brown or tan work beautifully. You can also experiment with metallic colors like gold or silver for a sleek‚ sophisticated appearance. Consider the overall theme of your space and the colors of your ornaments when making your choice. Coordinating your macrame tree with your home’s color palette ensures a cohesive and polished display. Additionally‚ using multiple shades in a gradient or pattern adds depth and uniqueness to your design. The flexibility of macrame allows you to customize the color scheme to suit your personal style perfectly.
5.3 Adding Personal Touches
Adding personal touches to your macrame Christmas tree allows you to infuse it with unique character and make it truly special. Consider incorporating beads‚ sequins‚ or small ornaments that reflect your personal style or holiday theme. You can also experiment with ribbons‚ bows‚ or appliques to add texture and visual interest. Another idea is to customize the tree’s purpose‚ such as creating a themed tree for a specific room or occasion. For instance‚ a coastal-themed tree might feature shells or nautical colors‚ while a rustic tree could include natural elements like pinecones. Additionally‚ you can personalize the tree by adding a name‚ date‚ or meaningful charm‚ making it a heartfelt gift or keepsake. By tailoring the design to your preferences‚ you create a one-of-a-kind piece that stands out and tells a story. This personalization makes your macrame Christmas tree not just a decoration‚ but a meaningful part of your holiday tradition.

Troubleshooting Common Mistakes
Troubleshooting common mistakes in macrame Christmas tree patterns helps ensure your project turns out perfectly. Issues like uneven tension or incorrect knot placement can easily be fixed by reviewing your work and adjusting as needed. Always double-check your pattern and starting point to avoid misalignment. If a mistake is too severe‚ it may be necessary to unravel and restart. Patience and attention to detail are key to achieving a professional finish. Regularly inspecting your work as you go can prevent major errors and save time in the long run. With practice‚ you’ll master the techniques and create flawless macrame designs.
6.1 Identifying Mistakes in Macrame Patterns
Identifying mistakes in macrame Christmas tree patterns is crucial for achieving a flawless design. Common errors include uneven tension‚ which can cause the tree to look lopsided‚ and incorrect knot placement‚ leading to misshapen branches. Miscounting the number of cord segments or failing to secure the base properly can also disrupt the structure. Additionally‚ inconsistent spacing between knots or using the wrong type of cord can affect the overall appearance. To identify these mistakes‚ carefully inspect each section as you work. Look for symmetry‚ even tension‚ and proper alignment of knots. If a mistake is spotted early‚ it can often be corrected by gently adjusting the knots or reworking a small section. Regular inspection and attention to detail are key to ensuring your macrame Christmas tree turns out as envisioned. By addressing issues promptly‚ you can avoid major corrections later in the process;
6.2 Fixing Common Errors
Fixing common errors in macrame Christmas tree patterns requires patience and attention to detail. If uneven tension is noticed‚ gently adjust the knots to balance the structure. For incorrect knot placement‚ carefully undo the affected area and rework the knots‚ ensuring proper alignment. If cords are miscounted‚ add or remove strands as needed while maintaining the pattern’s symmetry. To correct loose sections‚ tighten knots incrementally‚ avoiding over-tightening‚ which can distort the design. For misshapen branches‚ reposition the knots or adjust the spacing. Regularly inspecting your work and addressing errors early prevents major corrections later. Use a pin or clip to hold sections in place while fixing mistakes. By systematically identifying and repairing issues‚ you can restore your macrame Christmas tree to its intended beauty and functionality‚ ensuring a professional-looking result.
Creating a macrame Christmas tree is a rewarding and creative project that combines traditional knotting techniques with festive charm. By following the patterns and steps outlined in this guide‚ you can craft a unique and personalized decoration that reflects your style. Macrame allows for endless customization‚ making each tree truly one-of-a-kind. Whether you’re a beginner or an experienced crafter‚ this project offers a fun and fulfilling way to add handmade beauty to your holiday decor. With patience and practice‚ you’ll master the knots and techniques to create a stunning macrame Christmas tree that will be cherished for years to come. Embrace the creativity and joy of this craft‚ and enjoy the satisfaction of displaying your own handmade holiday masterpiece.